![The Internet Guide for Rappers: 10 Steps to Establish Your Artist's Online Presence and Branding [eBook]](https://i0.wp.com/www.44faced.com/wp-content/uploads/2016/06/internet-guide-for-rappers_44faced_570.jpg?resize=570%2C570)
The Internet Guide for Rappers: 10 Steps to Establish Your Artist’s Online Presence and Branding is an eBook guide for rappers to take control of how they are perceived. According to the principle, “if you do not brand yourself, you will be branded,” by implementing the steps in this guide, you will learn how to stand out among the millions of other rappers out there.
What Will “The Internet Guide for Rappers” Give You?
The Internet Guide for Rappers will give you the ability to:
- Project a consistent set of values, strengths, motivations, beliefs and interests in your online presence
- Avoid oversights and mistakes that many aspiring artists make, which end up costing them their reputation
- Find what makes you unique as an artist, and learn how to emphasize that uniqueness in your communications
- Gain the confidence to present yourself in a concise, professional manner to any intended audience, from potential sponsors to your fans
- Write an impressive, comprehensive artist bio relevant to every audience
- Make photos that will communicate your strengths, motivations and uniqueness
- Use a communication plan example template and printable checklist to plan your networking activities with various people, audiences and communities in the upcoming 12 months
Why Did I Write “The Internet Guide for Rappers”?
I wrote The Internet Guide for Rappers after having worked with rappers, artists and producers, and seeing common mistakes repeating themselves. Either I would keep getting asked the same questions, or I would see some lack in the artist’s online presence or the way the artist was organized, which was holding them back.
I designed The Internet Guide for Rappers also as a DIY guide for artists to take control of their digital presence and career. The guide aims to be practical and hands on. It is made of actionable steps to realize each of the points. It also takes online presence and branding from the ground up; all the way from rethinking your artist name, to how you’ll plan your every action in the upcoming 12 months in order to reach your goals.
Here’s what The Internet Guide for Rappers includes:
Introduction
What is The Internet Guide for Rappers, and what will it give you?
Step 1. Choose Your Artist Name
A step-by-step process of scrutiny on your artist name: its strengths, weaknesses, what you can change, and what you can’t.
Step 2. Get Your Artist Name on All the Web Property You Can
A one-time task that will set the foundation of your artist name’s online real estate.
Step 3. Characterize Your Artist Profile
An essential process that will guide you to find what will make people want to become your loyal advocates.
Step 4. Write Your Artist Profile Statement
Frame the perception you want others to have of you as an artist in a 1-2 sentence zipped format.
Step 5. Write Your Artist Bio
How to put together a snapshot of your strengths, motivations and uniqueness as a rapper, including examples.
Step 6. Make Your Artist Photos
What kinds of photos you need to have of yourself, and tips for how to make yourself more photogenic.
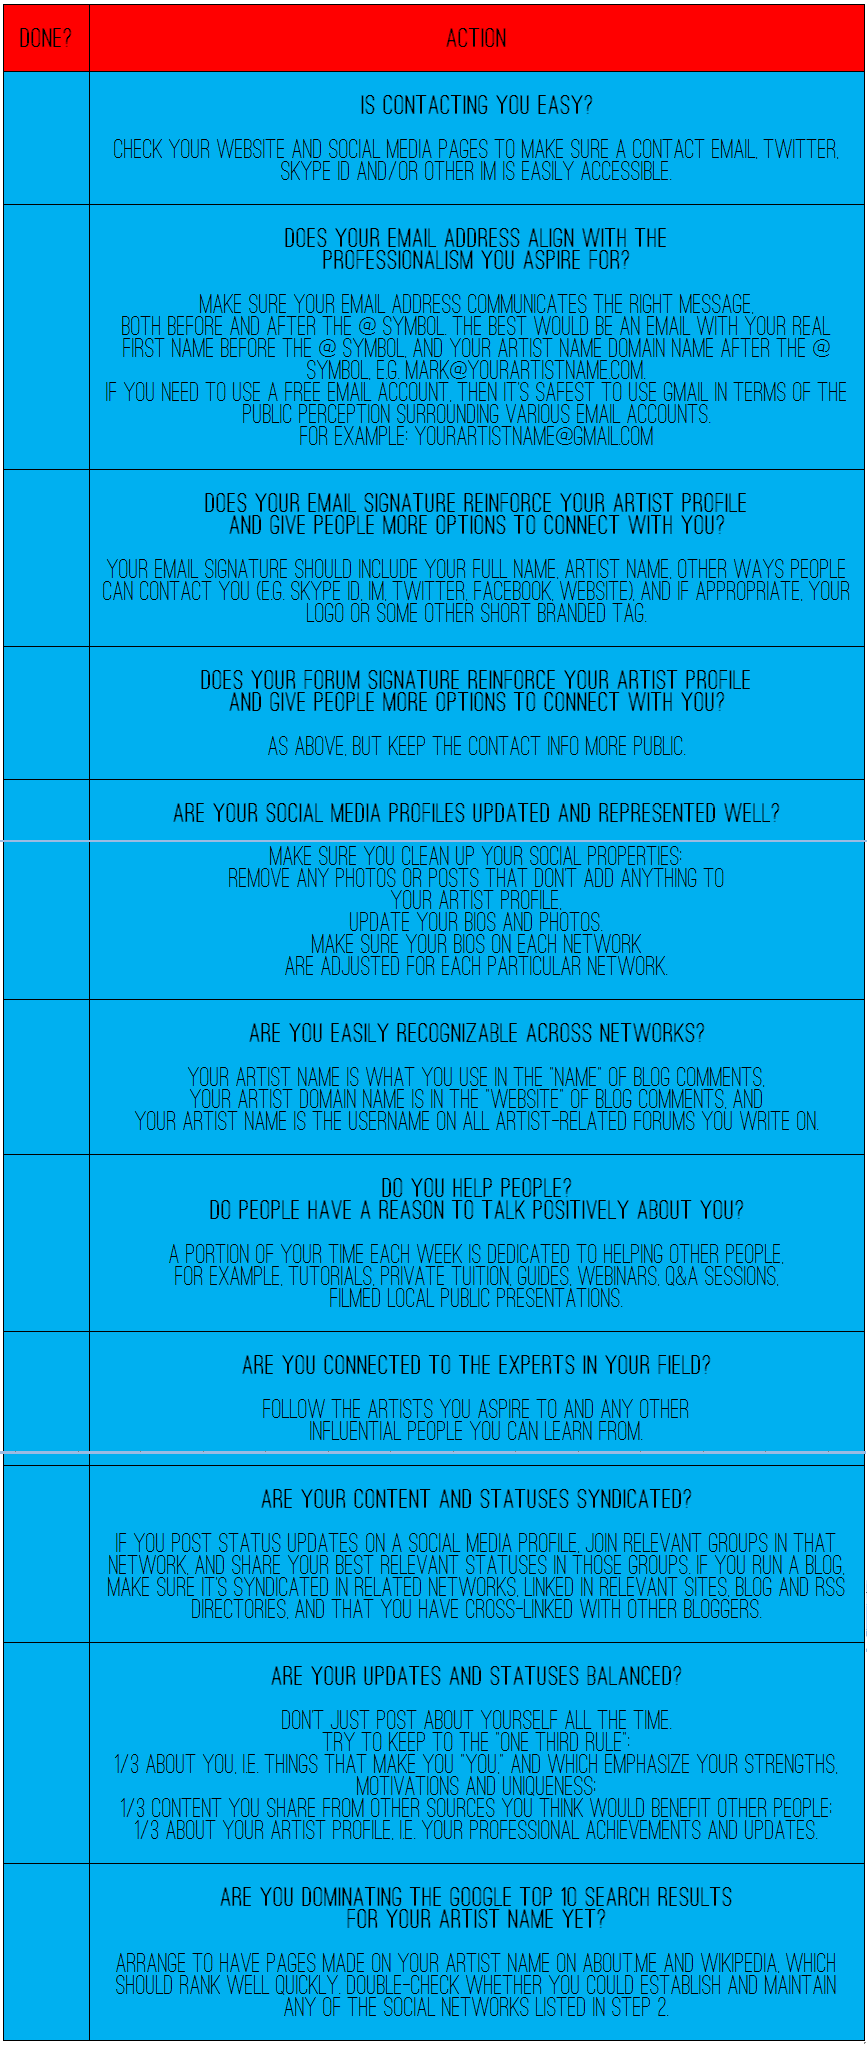
Step 7. Create a Communication Plan
A guide for how to plan your networking in the upcoming 12 months in order to help you realize your goals, and also to open you up to new opportunities.
Step 8. Implement Your Communication Plan
A checklist for you to apply across all your communication channels to maximize the impression you make.
Step 9. Setup Your Artist Profile as an Extension of Your Personal Brand
The importance of differentiating your artist profile and your personal brand from the very beginning, and how to setup your artist profile as an extension of your personal brand.
Template 1: Artist Characterization Template
A guide to fill out your artist characterization, as described in “Step 3. Characterize Your Artist Profile.”
Template 2: Artist Bio Template
The must-have parts of every artist’s bio to help you write your bio comprehensively and quickly, as described in “Step 5. Write Your Artist Bio.”
Template 3: Communication Plan Example Template
One example of how a 12 month communication plan looks like, for you to apply to your own networking actions over the next 12 months, as described in “Step 7. Create a Communication Plan.”
Template 4: Communication Plan Checklist
Template of the communication plan checklist described in “Step 8. Implement Your Communication Plan” for you to apply across all your communication channels, to maximize the impression you make.
Get PDF Version Get Kindle Edition